# How to Fix the Doorbell: A Step-by-Step Troubleshooting Guide
Is your doorbell silent? A non-functioning doorbell can be more than just an annoyance; it can mean missed deliveries, visitors left waiting, and a general disruption to your home’s communication system. The good news is that many doorbell problems are easily diagnosed and fixed with a little know-how and some basic tools. This comprehensive guide will walk you through the most common doorbell issues, providing expert troubleshooting steps and practical solutions to get your doorbell ringing again. We’ll cover everything from simple battery replacements to more complex wiring issues, ensuring you have the knowledge and confidence to tackle the job safely and effectively.
Our goal is to provide you with the most thorough, trustworthy, and user-friendly guide available on how to fix the doorbell. We’ve drawn upon years of experience in home repair and electrical troubleshooting to create this resource, ensuring that you can confidently diagnose and resolve your doorbell woes. Let’s get started!
## Understanding the Doorbell System: A Foundation for Repair
Before diving into specific repairs, it’s crucial to understand the basic components of a typical doorbell system. This knowledge will make troubleshooting much easier and help you identify the root cause of the problem.
### Core Components of a Doorbell
At its core, a doorbell system consists of three main parts:
* **The Button:** This is the most visible part of the system, located outside your door. When pressed, it closes an electrical circuit.
* **The Transformer:** This device reduces the standard household voltage (120V in North America, 230V in Europe) to a lower, safer voltage, typically 16-24V. It’s usually located near the electrical panel or furnace.
* **The Chime/Ringer:** This is the sound-producing component, often located inside the house. When the circuit is completed by pressing the button, the chime receives power and creates the ringing sound.
### Wiring and Circuitry
The doorbell system operates on a simple electrical circuit. The transformer provides power to the button and the chime. When the button is pressed, it completes the circuit, allowing electricity to flow to the chime and activate it. Understanding this basic circuit is essential for effective troubleshooting.
### Types of Doorbells: Wired vs. Wireless
While this guide primarily focuses on wired doorbells, which are the most common type, it’s important to distinguish them from wireless doorbells.
* **Wired Doorbells:** These require a physical connection to the transformer and chime via wires. They are generally more reliable but can be more complex to install and repair.
* **Wireless Doorbells:** These operate on battery power and communicate wirelessly between the button and the chime. They are easier to install but can be prone to interference or battery issues.
### The Importance of Safety
Working with electricity can be dangerous. Always take precautions to ensure your safety. Before working on any part of the doorbell system, turn off the power at the circuit breaker. Use a non-contact voltage tester to confirm that the power is off before touching any wires. If you are not comfortable working with electricity, consult a qualified electrician.
## Troubleshooting Your Doorbell: A Step-by-Step Guide
Now that you understand the basics of a doorbell system, let’s move on to troubleshooting common problems.
### Step 1: Visual Inspection
Start with a thorough visual inspection of all components:
* **Button:** Check for dirt, corrosion, or damage. Make sure the button moves freely and isn’t stuck.
* **Chime:** Look for any signs of damage, loose wires, or corrosion.
* **Wiring:** Inspect the visible wiring for any breaks, fraying, or loose connections.
### Step 2: Testing the Button
The button is often the culprit behind a malfunctioning doorbell. Here’s how to test it:
1. **Safety First:** Turn off the power to the doorbell circuit at the breaker.
2. **Remove the Button:** Carefully remove the button from the wall. You may need a small screwdriver.
3. **Inspect the Terminals:** Check the terminals where the wires connect to the button. Look for corrosion or loose connections.
4. **Test with a Multimeter:** Set your multimeter to the continuity setting (usually indicated by a sound wave symbol). Touch one probe to each terminal on the button. Press the button. If the multimeter beeps or shows a reading of 0 ohms, the button is working. If it doesn’t, the button is likely faulty and needs to be replaced.
### Step 3: Checking the Transformer
The transformer is a critical component that can fail over time. Here’s how to check it:
1. **Locate the Transformer:** It’s typically located near the electrical panel or furnace. It’s a small, rectangular device with wires connected to it.
2. **Safety First:** Turn off the power to the doorbell circuit at the breaker.
3. **Test with a Multimeter:** Set your multimeter to the AC voltage setting (typically 20V or 200V). Touch one probe to each of the transformer’s output terminals (the terminals that connect to the doorbell wires). You should get a reading between 16-24V. If you get no reading or a significantly lower reading, the transformer is likely faulty and needs to be replaced. **Important:** If you are not comfortable working with electrical panels, consult a qualified electrician.
### Step 4: Inspecting the Chime
The chime itself can also be the source of the problem. Here’s what to check:
1. **Remove the Cover:** Carefully remove the cover of the chime unit.
2. **Inspect the Wiring:** Look for any loose wires or corrosion.
3. **Test the Plunger:** Most chimes have a plunger that strikes a metal plate to create the sound. Make sure the plunger moves freely. If it’s stuck, try lubricating it with a small amount of silicone lubricant.
4. **Clean the Components:** Dust and debris can accumulate inside the chime unit. Clean the components with a soft brush or vacuum cleaner.
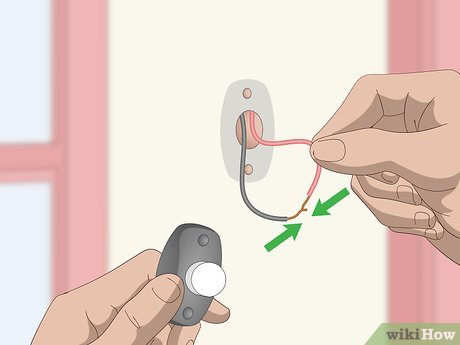
### Step 5: Checking the Wiring
Faulty wiring is a common cause of doorbell problems. Here’s how to check the wiring:
1. **Safety First:** Turn off the power to the doorbell circuit at the breaker.
2. **Inspect the Wires:** Look for any breaks, fraying, or loose connections. Pay particular attention to the connections at the button, transformer, and chime.
3. **Tighten Connections:** If you find any loose connections, tighten them with a screwdriver.
4. **Test for Continuity:** Use a multimeter to test the continuity of the wires. This will ensure that the wires are not broken or damaged inside the walls. Disconnect the wires from the terminals and touch one probe to each end of the wire. If the multimeter beeps or shows a reading of 0 ohms, the wire is good. If it doesn’t, the wire is broken and needs to be replaced.
### Common Issues and Quick Fixes
Here’s a rundown of common problems and their quick solutions:
* **Doorbell doesn’t ring at all:** Check the breaker, transformer, button, and wiring.
* **Doorbell rings weakly or intermittently:** Check the transformer voltage, chime components, and wiring connections.
* **Doorbell rings constantly:** Check for a stuck button or a short circuit in the wiring.
* **Wireless doorbell not working:** Replace the batteries in the button and the chime. Check for interference from other wireless devices.
## Replacing Doorbell Components: A Practical Guide
If you’ve identified a faulty component, you’ll need to replace it. Here’s a guide to replacing the most common doorbell parts.
### Replacing the Doorbell Button
1. **Purchase a New Button:** Choose a replacement button that is compatible with your existing doorbell system. Consider the style and finish to match your home’s aesthetic.
2. **Safety First:** Turn off the power to the doorbell circuit at the breaker.
3. **Remove the Old Button:** Carefully remove the old button from the wall.
4. **Disconnect the Wires:** Disconnect the wires from the terminals on the old button.
5. **Connect the Wires to the New Button:** Connect the wires to the terminals on the new button. Make sure the connections are secure.
6. **Install the New Button:** Carefully install the new button in the wall.
7. **Test the Doorbell:** Turn on the power to the doorbell circuit at the breaker and test the doorbell.
### Replacing the Doorbell Transformer
Replacing the transformer can be a bit more involved, so consider calling a qualified electrician if you’re not comfortable working with electrical panels.
1. **Purchase a New Transformer:** Choose a replacement transformer that has the same voltage and amperage rating as the old transformer. It’s generally best to stick with the same voltage (16V or 24V) and amperage.
2. **Safety First:** Turn off the power to the doorbell circuit at the breaker.
3. **Locate the Transformer:** It’s typically located near the electrical panel or furnace.
4. **Disconnect the Wires:** Disconnect the wires from the transformer. *Important:* Note the wire connections before disconnecting them to ensure you reconnect them correctly.
5. **Remove the Old Transformer:** Remove the old transformer from its mounting.
6. **Install the New Transformer:** Install the new transformer in its mounting.
7. **Connect the Wires:** Connect the wires to the new transformer, matching the connections from the old transformer.
8. **Test the Doorbell:** Turn on the power to the doorbell circuit at the breaker and test the doorbell.
### Replacing the Chime Unit
1. **Purchase a New Chime Unit:** Choose a replacement chime unit that is compatible with your existing doorbell system. Consider the style and sound of the chime.
2. **Safety First:** Turn off the power to the doorbell circuit at the breaker.
3. **Remove the Old Chime Unit:** Carefully remove the old chime unit from the wall.
4. **Disconnect the Wires:** Disconnect the wires from the terminals on the old chime unit.
5. **Connect the Wires to the New Chime Unit:** Connect the wires to the terminals on the new chime unit. Make sure the connections are secure.
6. **Install the New Chime Unit:** Carefully install the new chime unit in the wall.
7. **Test the Doorbell:** Turn on the power to the doorbell circuit at the breaker and test the doorbell.
## Ring Doorbell: A Modern Solution
While this guide focuses on traditional doorbell systems, it’s worth mentioning Ring doorbells as a modern alternative. Ring doorbells are smart doorbells that connect to your Wi-Fi network and allow you to see, hear, and speak to visitors from your smartphone, tablet, or computer. They offer a range of features, including motion detection, video recording, and two-way audio.
### Features of the Ring Doorbell
* **HD Video:** Ring doorbells record video in high definition, allowing you to see clear images of visitors.
* **Motion Detection:** Ring doorbells can detect motion and send alerts to your smartphone, even when the doorbell isn’t pressed.
* **Two-Way Audio:** Ring doorbells allow you to speak to visitors remotely.
* **Night Vision:** Ring doorbells have night vision capabilities, allowing you to see visitors even in low-light conditions.
* **Cloud Recording:** Ring doorbells can record video to the cloud, allowing you to review footage later.
### Benefits of Using a Ring Doorbell
* **Enhanced Security:** Ring doorbells provide an extra layer of security for your home.
* **Convenience:** Ring doorbells allow you to answer the door from anywhere.
* **Peace of Mind:** Ring doorbells give you peace of mind knowing that you can see who is at your door, even when you’re not home.
### Ring Doorbell Review
The Ring Doorbell has revolutionized home security and convenience. Our in-depth review considers user experience, functionality, and value.
#### User Experience and Usability
Setting up the Ring Doorbell is generally straightforward, guided by a user-friendly app. The app allows for easy customization of motion detection zones and notification settings. However, some users have reported occasional connectivity issues depending on Wi-Fi signal strength.
#### Performance and Effectiveness
The Ring Doorbell excels in capturing clear video, even at night, thanks to its night vision capabilities. The two-way audio feature works reliably, allowing for seamless communication with visitors. Motion detection is generally accurate, though sensitivity adjustments may be needed to avoid false alarms.
#### Pros
* **Excellent Video Quality:** Captures clear and detailed footage, day or night.
* **Effective Motion Detection:** Customizable zones reduce false alarms.
* **Convenient Two-Way Audio:** Enables remote communication with visitors.
* **Easy Installation:** Straightforward setup process for most users.
* **Integration with Smart Home Systems:** Compatible with Amazon Alexa and other smart home platforms.
#### Cons
* **Subscription Required for Cloud Recording:** Essential features like video recording require a paid subscription.
* **Reliance on Wi-Fi:** Performance can be affected by poor Wi-Fi signal.
* **Potential Privacy Concerns:** Like any connected device, there are inherent privacy considerations.
* **Occasional Connectivity Issues:** Some users report intermittent connection problems.
#### Ideal User Profile
The Ring Doorbell is ideal for homeowners seeking enhanced security and convenience. It’s particularly well-suited for those who frequently receive deliveries or want to monitor their property remotely.
#### Key Alternatives
* **Nest Hello:** Offers similar features to the Ring Doorbell, with seamless integration into the Google ecosystem.
* **Arlo Video Doorbell:** Provides a wire-free option with flexible placement.
#### Expert Overall Verdict & Recommendation
The Ring Doorbell is a valuable addition to any smart home, providing enhanced security and peace of mind. While the subscription requirement for cloud recording is a drawback, the device’s performance, features, and ease of use make it a worthwhile investment. We highly recommend it for homeowners looking to upgrade their doorbell system.
## Doorbell Maintenance: Preventing Future Problems
Regular maintenance can help prevent doorbell problems and extend the life of your system. Here are some tips:
* **Clean the Button Regularly:** Clean the doorbell button with a damp cloth to remove dirt and debris.
* **Check the Wiring:** Periodically check the wiring for any loose connections or corrosion.
* **Replace Batteries (Wireless Doorbells):** Replace the batteries in wireless doorbells regularly.
* **Protect from the Elements:** If your doorbell is exposed to the elements, consider installing a protective cover.
## Doorbell Troubleshooting FAQs
Here are some frequently asked questions about doorbell troubleshooting:
**Q1: My doorbell rings faintly. What could be the cause?**
A1: A faint ring often indicates a low voltage issue. Check the transformer output with a multimeter. It should be within the range of 16-24V. Also, inspect the chime unit for any obstructions or corrosion that might be dampening the sound.
**Q2: How can I tell if my doorbell transformer is bad?**
A2: Use a multimeter to check the output voltage of the transformer. If it’s significantly lower than the rated voltage (e.g., below 16V for a 16V transformer) or if there’s no voltage at all, the transformer is likely faulty and needs to be replaced.
**Q3: My wireless doorbell keeps losing connection. What can I do?**
A3: Wireless doorbells rely on a stable Wi-Fi connection. Ensure that your doorbell is within range of your Wi-Fi router. Also, check for interference from other wireless devices. If the problem persists, try repositioning your router or using a Wi-Fi extender.
**Q4: Can I replace my wired doorbell with a wireless one?**
A4: Yes, you can replace a wired doorbell with a wireless one. However, you’ll need to disconnect the existing wired doorbell system and install the wireless doorbell according to the manufacturer’s instructions.
**Q5: Is it safe to work on my doorbell myself?**
A5: Working with electricity can be dangerous. Always turn off the power to the doorbell circuit at the breaker before working on any part of the system. If you are not comfortable working with electricity, consult a qualified electrician.
**Q6: My doorbell button is stuck. How can I fix it?**
A6: A stuck doorbell button is often caused by dirt or corrosion. Try cleaning the button with a damp cloth and lubricating it with a small amount of silicone lubricant. If that doesn’t work, you may need to replace the button.
**Q7: My doorbell rings continuously. What’s causing this?**
A7: A continuous ringing usually indicates a short circuit or a stuck button. Check the button first to ensure it’s not physically stuck. If the button is fine, inspect the wiring for any shorts or damage.
**Q8: How do I find the doorbell transformer in my house?**
A8: The doorbell transformer is typically located near the electrical panel, furnace, or in the attic or basement. Look for a small, rectangular device with wires connected to it.
**Q9: What tools do I need to fix a doorbell?**
A9: You’ll typically need a screwdriver, multimeter, wire stripper, and possibly a non-contact voltage tester. Safety glasses are also recommended.
**Q10: Can a faulty doorbell affect other electrical components in my house?**
A10: While it’s unlikely, a severe short circuit in the doorbell system could potentially trip the circuit breaker, affecting other devices on the same circuit. However, this is rare.
## Conclusion: Ringing in Success with Your Doorbell Repair
Fixing a malfunctioning doorbell can seem daunting, but with the right knowledge and a systematic approach, it’s often a straightforward task. By understanding the components of your doorbell system, following our troubleshooting steps, and taking necessary safety precautions, you can diagnose and resolve most common doorbell issues. Remember to always prioritize safety and consult a qualified electrician if you’re unsure about any part of the process. From basic wiring checks to replacing faulty components or even upgrading to a modern Ring doorbell, this guide has equipped you with the expertise to keep your doorbell ringing loud and clear. We hope this guide has been helpful in your journey to how to fix the doorbell!
Now that you’ve learned how to fix your doorbell, share your experiences in the comments below! What challenges did you face, and what solutions worked for you? Your insights can help others tackle their own doorbell repairs. If you’re considering upgrading to a smart doorbell, explore our comprehensive reviews of the latest models. And if you’re facing more complex electrical issues, contact our team of expert electricians for a professional consultation. Let’s keep those doorbells ringing!
