How to Replace Disk Brakes: A Step-by-Step Guide for Safe & Effective Replacement
Replacing your disk brakes might seem daunting, but with the right knowledge, tools, and a bit of patience, it’s a manageable DIY project that can save you money and give you a sense of accomplishment. This comprehensive guide will walk you through every step of the process, ensuring a safe and effective replacement. We’ll cover everything from identifying when your brakes need replacing to choosing the right components and performing the replacement itself. Our goal is to provide you with the most trustworthy and expert information, empowering you to tackle this task with confidence. Based on our team’s experience and knowledge, we’ve crafted this guide to be both detailed and easy to follow, making it the ultimate resource for anyone looking to learn how to replace disk brakes.
1. Understanding Your Disk Brakes: When to Replace Them
Disk brakes are a crucial safety component of any vehicle, and understanding their function and maintenance is paramount. Unlike drum brakes, disk brakes use calipers to squeeze brake pads against a rotor, generating friction to slow or stop the vehicle. Recognizing the signs of wear and knowing when to replace your disk brakes is essential for maintaining optimal braking performance and preventing accidents.
1.1 Identifying the Signs of Worn Disk Brakes
Several telltale signs indicate that your disk brakes need replacing. These include:
* **Squealing or Grinding Noises:** This is often the most obvious indicator. A high-pitched squeal usually means the brake pad wear indicator is contacting the rotor. A grinding noise suggests the brake pads are completely worn, and the metal backing plate is rubbing against the rotor. This is a serious issue that requires immediate attention.
* **Reduced Braking Performance:** If you notice that your car takes longer to stop or that you need to apply more pressure to the brake pedal, your brake pads may be worn. Reduced braking efficiency can be dangerous, especially in emergency situations.
* **Vibrations or Pulsations When Braking:** These sensations, felt through the brake pedal or steering wheel, can indicate warped rotors or uneven wear on the brake pads. Warped rotors reduce the contact area between the pads and rotors, leading to diminished braking power.
* **Visible Wear on Brake Pads:** A visual inspection of the brake pads can reveal their condition. Most brake pads have a wear indicator groove or slot. If the pad material is worn down to this indicator, it’s time for a replacement. If you can’t see much pad material left at all, replacement is urgent.
* **Brake Fluid Leaks:** Although not directly related to brake pad wear, brake fluid leaks around the calipers are a serious concern. Low brake fluid can compromise the entire braking system and requires immediate professional attention.
1.2 The Role of Rotors in Brake System Performance
Rotors, also known as brake discs, are the rotating components that the brake pads clamp onto. Their condition directly affects braking performance. Over time, rotors can become scored, warped, or develop excessive rust. While resurfacing rotors (also known as “turning” rotors) was once a common practice, many modern rotors are designed to be replaced rather than resurfaced due to their thinner construction. According to industry experts, replacing rotors along with brake pads is generally recommended for optimal braking performance and safety.
1.3 Understanding Brake Pad Materials
Brake pads come in various materials, each with its own advantages and disadvantages:
* **Organic (Non-Asbestos Organic – NAO):** These pads are made from materials like rubber, carbon, and fiberglass. They are typically quieter and gentler on rotors but wear out faster than other types.
* **Semi-Metallic:** These pads contain a mix of metal fibers and organic materials. They offer a good balance of braking performance, durability, and cost.
* **Ceramic:** These pads are made from ceramic fibers and non-ferrous metal fillers. They are known for their quiet operation, long lifespan, and excellent braking performance, especially at higher temperatures. However, they are generally more expensive than other types.
Choosing the right brake pad material depends on your driving habits, vehicle type, and budget. Consult your vehicle’s manufacturer recommendations or a trusted mechanic for advice.
2. Essential Tools and Materials for Replacing Disk Brakes
Before you begin, gather all the necessary tools and materials. Having everything on hand will make the process smoother and more efficient. Here’s a comprehensive list:
* **New Brake Pads:** Choose the correct type for your vehicle (organic, semi-metallic, or ceramic).
* **New Rotors (Recommended):** As mentioned earlier, replacing rotors along with brake pads is often recommended.
* **Brake Caliper Tool:** This tool is used to compress the caliper piston back into the caliper housing, creating space for the new, thicker brake pads. There are different types of caliper tools, so choose one that is compatible with your vehicle’s brake system.
* **Wrench Set:** You’ll need wrenches to remove the caliper bolts and other components.
* **Socket Set:** A socket set will provide the necessary leverage for loosening and tightening bolts.
* **Screwdrivers:** Both flathead and Phillips head screwdrivers may be required.
* **Jack and Jack Stands:** Essential for safely lifting and supporting the vehicle.
* **Wheel Chocks:** To prevent the vehicle from rolling.
* **Brake Cleaner:** To clean the rotors and calipers.
* **Brake Fluid:** To top off the brake fluid reservoir after the replacement.
* **Torque Wrench:** To tighten bolts to the manufacturer’s specified torque.
* **Gloves:** To protect your hands.
* **Safety Glasses:** To protect your eyes.
* **Penetrating Oil:** To loosen stubborn bolts.
* **Wire Brush:** To clean rust and debris from the caliper and rotor mounting surfaces.
* **Shop Rags:** For cleaning up spills and wiping down components.
* **Manual or Online Repair Guide:** Having a vehicle-specific repair guide can be invaluable for identifying components and torque specifications.
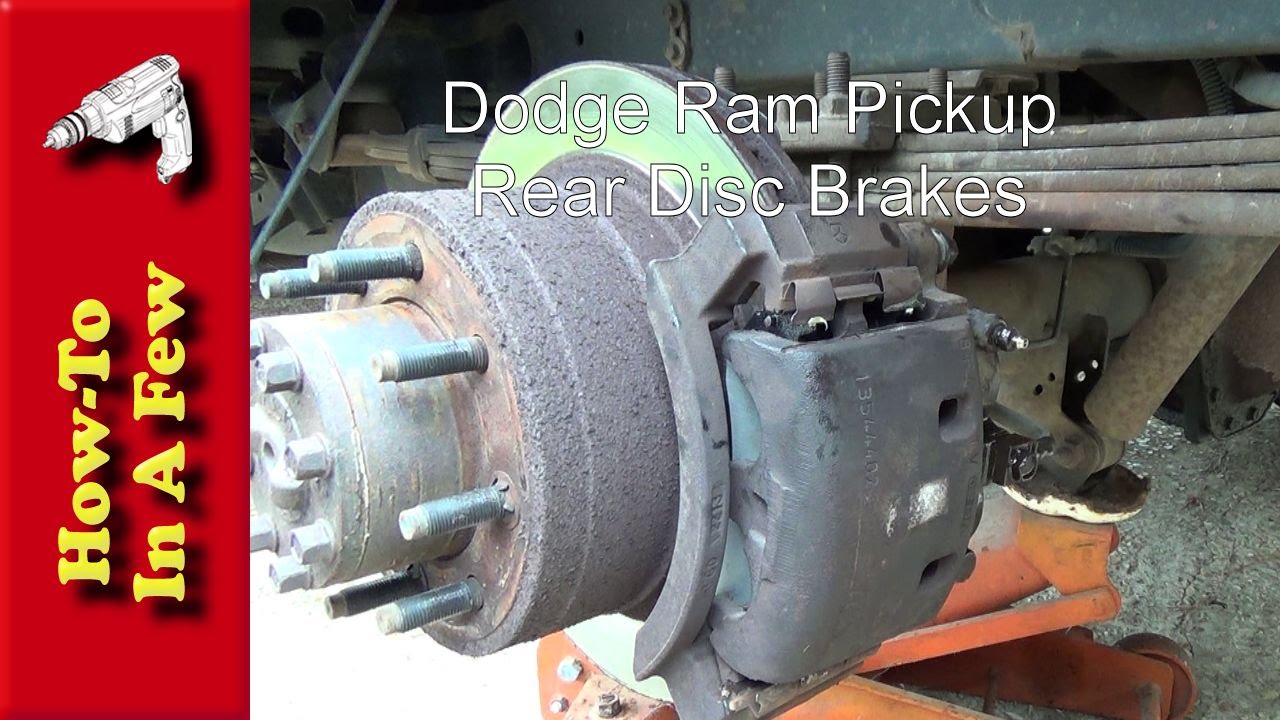
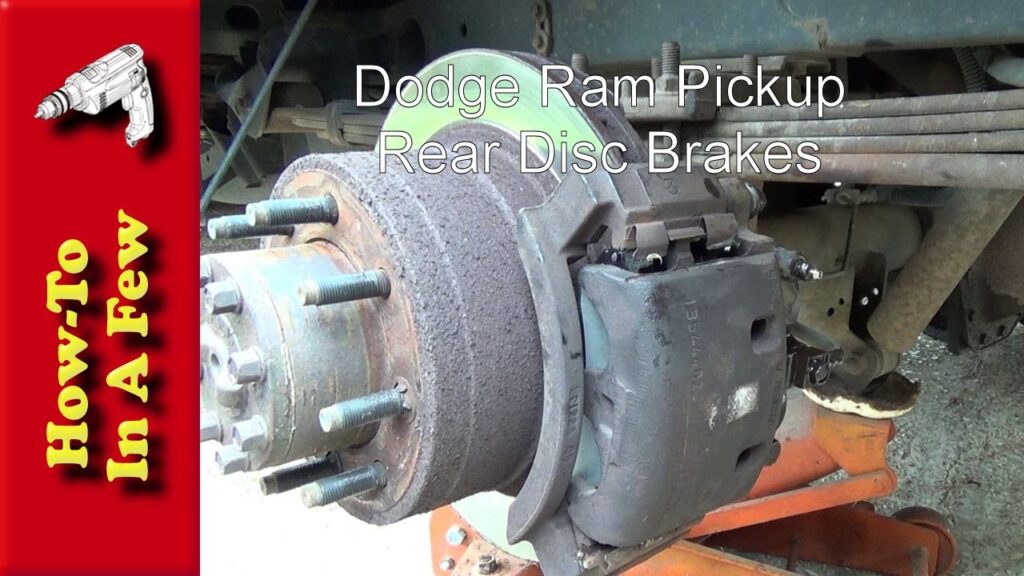
3. Step-by-Step Guide: How to Replace Disk Brakes
Now that you have the tools and materials, let’s get to the actual replacement process. Always prioritize safety and follow these steps carefully:
3.1 Preparation
1. **Safety First:** Park the vehicle on a level surface, engage the parking brake, and place wheel chocks behind the rear wheels. Wear safety glasses and gloves.
2. **Loosen Lug Nuts:** Use a lug wrench to loosen the lug nuts on the wheel you’ll be working on. Don’t remove them completely at this stage.
3. **Raise the Vehicle:** Use a jack to lift the vehicle and securely place it on jack stands. Never work under a vehicle supported only by a jack.
4. **Remove the Wheel:** Completely remove the lug nuts and take off the wheel.
3.2 Removing the Old Brake Components
1. **Inspect the Brake System:** Before disassembling anything, take a good look at the brake system. Note the position of the brake lines and any other components that might need to be reconnected later.
2. **Remove the Caliper Bolts:** Locate the bolts that hold the caliper to the caliper mounting bracket. Use a wrench or socket to remove these bolts. You may need to use penetrating oil if they are corroded. *Pro-Tip: Sometimes these bolts are very tight and may require a breaker bar for extra leverage.*
3. **Remove the Caliper:** Carefully slide the caliper off the rotor. Be careful not to damage the brake line. If the caliper is difficult to remove, gently pry it off with a screwdriver. Hang the caliper from the suspension using a bungee cord or wire to avoid straining the brake line. *Do not let the caliper hang freely by the brake line!*
4. **Remove the Old Brake Pads:** Slide the old brake pads out of the caliper mounting bracket. Note their orientation for reference when installing the new pads.
5. **Remove the Caliper Mounting Bracket (If Necessary):** Some vehicles require you to remove the caliper mounting bracket to remove the rotor. If necessary, remove the bolts holding the bracket to the hub assembly.
6. **Remove the Rotor:** If the rotor is held in place by retaining screws, remove them. The rotor may be stuck due to rust. Use a rubber mallet to gently tap the rotor until it comes loose. *If the rotor is severely stuck, you may need to use a penetrating oil and a more forceful hammer.*
3.3 Installing the New Brake Components
1. **Clean the Hub Assembly:** Use a wire brush to clean any rust or debris from the hub assembly where the rotor mounts.
2. **Install the New Rotor:** Slide the new rotor onto the hub assembly. If there are retaining screws, install them and tighten them to the manufacturer’s specified torque.
3. **Install the Caliper Mounting Bracket (If Removed):** If you removed the caliper mounting bracket, reinstall it and tighten the bolts to the manufacturer’s specified torque.
4. **Compress the Caliper Piston:** Use a brake caliper tool to compress the caliper piston back into the caliper housing. This creates space for the new, thicker brake pads. *Ensure you are using the correct type of caliper tool for your vehicle as some require a twisting motion to retract the piston.*
5. **Install the New Brake Pads:** Slide the new brake pads into the caliper mounting bracket, ensuring they are properly seated.
6. **Reinstall the Caliper:** Carefully slide the caliper back onto the rotor and over the brake pads. Align the caliper with the mounting bracket and reinstall the caliper bolts. Tighten the bolts to the manufacturer’s specified torque.
3.4 Final Steps
1. **Repeat on the Other Side:** Repeat the entire process on the other wheel.
2. **Bleed the Brakes (If Necessary):** If you opened the brake lines or if the brake pedal feels spongy, you may need to bleed the brakes to remove air from the system. This is a more advanced procedure that may require professional assistance.
3. **Top Off Brake Fluid:** Check the brake fluid reservoir and top it off with the correct type of brake fluid.
4. **Reinstall the Wheels:** Reinstall the wheels and tighten the lug nuts by hand. Lower the vehicle to the ground and use a torque wrench to tighten the lug nuts to the manufacturer’s specified torque.
5. **Test the Brakes:** Before driving the vehicle, pump the brake pedal several times to ensure the brake pads are properly seated against the rotors. Take the vehicle for a short test drive, starting slowly and gradually increasing your speed. Pay attention to the feel of the brakes and listen for any unusual noises.
4. Choosing the Right Brake Pads and Rotors
Selecting the appropriate brake pads and rotors is crucial for optimal braking performance and safety. Consider these factors:
* **Vehicle Type:** Different vehicles have different braking requirements. Choose brake pads and rotors that are specifically designed for your vehicle make and model.
* **Driving Habits:** Aggressive driving, such as frequent hard braking, requires more durable brake pads and rotors.
* **Budget:** Brake pads and rotors range in price from budget-friendly options to high-performance alternatives. Choose products that fit your budget while still meeting your safety and performance needs.
* **Material:** As discussed earlier, brake pads come in various materials (organic, semi-metallic, and ceramic). Each material offers different characteristics in terms of performance, durability, and noise.
* **Brand Reputation:** Choose reputable brands known for producing high-quality brake components. Read reviews and compare products before making a purchase.
5. Troubleshooting Common Brake Replacement Issues
Even with careful preparation, you may encounter some challenges during the brake replacement process. Here are some common issues and how to address them:
* **Stuck Caliper Bolts:** If the caliper bolts are corroded and difficult to remove, use penetrating oil and a breaker bar for extra leverage. You may also need to heat the bolts with a torch to loosen them.
* **Stuck Rotor:** If the rotor is stuck due to rust, use a rubber mallet to gently tap it until it comes loose. You may also need to use penetrating oil and a more forceful hammer.
* **Difficulty Compressing the Caliper Piston:** If you’re having trouble compressing the caliper piston, make sure you’re using the correct type of caliper tool. Some calipers require you to twist the piston while compressing it.
* **Spongy Brake Pedal:** A spongy brake pedal indicates air in the brake lines. You’ll need to bleed the brakes to remove the air.
* **Brake Noise:** Some brake noise is normal after replacing brake pads and rotors. However, excessive noise, such as squealing or grinding, may indicate a problem. Check the installation and ensure that all components are properly seated and lubricated.
6. Benefits of Replacing Your Own Disk Brakes
While it requires some effort, replacing your own disk brakes offers several advantages:
* **Cost Savings:** You’ll save money on labor costs by doing the job yourself.
* **Increased Knowledge:** You’ll gain a better understanding of your vehicle’s braking system.
* **Sense of Accomplishment:** You’ll feel proud of yourself for completing a challenging DIY project.
* **Control Over Quality:** You can choose the specific brake pads and rotors you want to use, ensuring high-quality components.
7. Safety Precautions When Working with Brakes
Safety is paramount when working on your vehicle’s brakes. Here are some essential safety precautions:
* **Always Wear Safety Glasses and Gloves:** Protect your eyes and hands from debris and chemicals.
* **Use Jack Stands:** Never work under a vehicle supported only by a jack.
* **Disconnect the Negative Battery Terminal:** This prevents accidental electrical shocks.
* **Work in a Well-Ventilated Area:** Brake cleaner and other chemicals can produce harmful fumes.
* **Dispose of Old Brake Pads Properly:** Brake pads may contain asbestos or other hazardous materials. Check your local regulations for proper disposal methods.
8. Disk Brake Maintenance Tips
Proper maintenance can extend the life of your disk brakes and ensure optimal performance:
* **Regular Inspections:** Inspect your brake pads and rotors regularly for wear and damage.
* **Keep Brake Fluid Clean:** Flush the brake fluid every two years to remove contaminants and moisture.
* **Lubricate Caliper Slides:** Lubricate the caliper slides periodically to ensure smooth operation.
* **Avoid Hard Braking:** Excessive hard braking can wear down brake pads and rotors prematurely.
9. The Future of Brake Technology
Brake technology is constantly evolving, with advancements such as:
* **Regenerative Braking:** Used in hybrid and electric vehicles, regenerative braking captures kinetic energy during braking and converts it into electricity, increasing efficiency.
* **Electronic Parking Brakes:** Electronic parking brakes offer improved convenience and safety features.
* **Advanced Driver-Assistance Systems (ADAS):** ADAS features, such as automatic emergency braking, rely on sophisticated brake systems to prevent accidents.
10. Q&A: Your Disk Brake Questions Answered
Here are some frequently asked questions about disk brakes:
* **Q: How often should I replace my disk brakes?**
* **A:** It depends on your driving habits and the type of brake pads you use. Generally, brake pads should be replaced every 25,000 to 70,000 miles.
* **Q: Can I replace just the brake pads and not the rotors?**
* **A:** While you can, it’s generally recommended to replace the rotors along with the brake pads for optimal braking performance and safety.
* **Q: What type of brake fluid should I use?**
* **A:** Use the type of brake fluid recommended in your vehicle’s owner’s manual. Using the wrong type of brake fluid can damage the brake system.
* **Q: How do I know if my rotors are warped?**
* **A:** Warped rotors can cause vibrations or pulsations when braking.
* **Q: Can I resurface my rotors instead of replacing them?**
* **A:** While resurfacing rotors (also known as “turning” rotors) was once a common practice, many modern rotors are designed to be replaced rather than resurfaced due to their thinner construction.
* **Q: What is the difference between organic, semi-metallic, and ceramic brake pads?**
* **A:** Organic pads are quieter and gentler on rotors but wear out faster. Semi-metallic pads offer a good balance of performance and durability. Ceramic pads are known for their quiet operation, long lifespan, and excellent braking performance.
* **Q: How do I bleed my brakes?**
* **A:** Bleeding brakes involves opening the bleeder screws on the calipers and pumping the brake pedal to remove air from the brake lines. This is a more advanced procedure that may require professional assistance.
* **Q: What is brake fade?**
* **A:** Brake fade is a temporary reduction in braking performance caused by excessive heat buildup in the brake system.
* **Q: How do I prevent brake fade?**
* **A:** Avoid excessive hard braking, use high-quality brake pads and rotors, and consider upgrading to a more robust brake system if you frequently drive in demanding conditions.
* **Q: Is it safe to drive with worn brake pads?**
* **A:** It is not safe to drive with worn brake pads. Worn brake pads can compromise braking performance and increase the risk of accidents.
Conclusion: Empowering You to Replace Your Disk Brakes Safely
Replacing your disk brakes is a rewarding DIY project that can save you money and enhance your understanding of your vehicle. By following this comprehensive guide, you can confidently tackle this task and ensure your vehicle’s braking system is in top condition. Remember to prioritize safety, use the correct tools and materials, and consult a professional if you encounter any difficulties. With a little preparation and effort, you can keep your vehicle safe and reliable for years to come. Now that you understand how to replace disk brakes, consider sharing your experiences in the comments below or exploring our advanced guide to brake system maintenance. If you’re still unsure about tackling this project yourself, contact our experts for a consultation on how to replace disk brakes safely and effectively.
